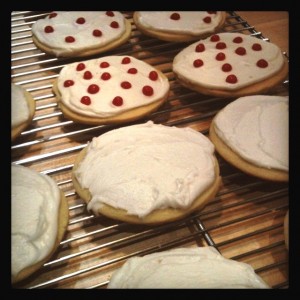
gluten free soft sugar cookies
| Serves | 2-3 dozen |
| Prep time | 45 minutes |
| Cook time | 25 minutes |
| Total time | 1 hours, 10 minutes |
| Allergy | Tree Nuts |
| Dietary | Gluten Free, Vegan, Vegetarian |
| Meal type | Dessert |
| Occasion | Barbecue, Birthday Party, Casual Party, Christmas, Easter, Formal Party, Halloween, Thanksgiving, Valentines day |
gluten free sugar cookie, frosted cookie
Ingredients
- 1 c. butter, non-dairy butter or vegetable shortening
- 1 1/2 c. powdered sugar
- 1 1/2 c. sweet rice flour
- 3/4 c. tapioca starch
- 3/4 c. potato starch (not potato flour!!)
- 1/4 c. millet flour
- 1/4 c. almond meal
- 1 egg or egg replacer (I use 1 Tbs. golden flax meal + 3 Tbs. warm water)
- 1 tsp. cream of tartar
- 1 tsp. baking soda
- 1 1/2 tsp. xanathan gum
- 1/4 tsp. gluten free almond extract
- 1 tsp. gluten free vanilla extract
Frosting
- 3 Tbs butter, non-dairy butter or vegetable shortening
- 1 tsp. gluten free vanilla extract
- 1/4 c. milk or non-dairy milk (I use almond milk)
- 2-3 c. powdered sugar (this is just a guess as I have never measured out how much I actually use)
Note
This is the frosted sugar cookie recipe my family has used for YEARS, and I finally converted it. This is our standard Christmas and Valentine's Day cookie recipe.
Follow me on Facebook: www.facebook.com/GFAFRecipes
Directions
| 1. | Preheat oven to 375 degrees Fahrenheit. | |
| 2. | Mix all dry ingredients for cookies in a bowl and set aside. | |
| 3. | Cream butter/non-dairy butter with powdered sugar in a mixer. Start at a low speed and increase speed as the butter is incorporated--otherwise you'll have a BIG mess on your hands! | |
| 4. | Add egg or egg replacer and the flavoring extracts and mix; scrape down sides to get all of the butter/sugar mix blended with the egg/egg replacer. | |
| 5. | Gradually add in the dry ingredients and mix thoroughly. | |
| 6. | Sprinkle counter with powdered sugar and roll out the cookies until they are about 1/4" thick (I prefer to use powdered sugar to roll out cookies instead of gluten free flours as it tastes good and not flour-y if some is left on the bottom of the cookies). Cut with cookie cutters. | |
| 7. | Spray a cookie sheet or use parchment paper on the cookie sheet; arrange cookies so they have a little room to expand during baking. | |
| 8. | Bake 7-8 minutes; do NOT let them cook so long that they turn brown or you will have crunchy cookies! I always aim to have them look a little under cooked as they will continue to cook a bit when you remove them from the oven. | |
| 9. | THE NEXT STEP IS IMPORTANT!! Remove the cookies from the cookie sheet IMMEDIATELY after removing them from the oven; if you wait, they will stick to the pan, crumble when you scrape them off, and you will be sad you wasted your time! | |
| 10. | Put cookies on a wire cooling rack and frost once cool. | |
| 11. | For the frosting, just all all ingredients to a mixer and whip until the frosting is of a spreading consistency. You may need more powdered sugar or more milk, depending on how you like your frosting. Honestly, I never measure the ingredients for frosting, so this is just a guess on how much I use. I've ALWAYS just "eyeballed" it. |





 Print recipe